A thermal energy meter that you can trust - Blog series part 2
This blog post is the second part of two blog posts regarding thermal energy meters. In this blog post, we dive into the European standard EN1434 and how it secures trust into your meters. Check our first part of the series on the European framework for legal metrology. We hope you will find the blog posts interesting.
Part 2: European Standard EN1434 ensures repeatability
Billing and optimization are some of the key features brought to owners of meters. As always when it comes to topics related to money, disputes and discussions can follow. Therefore, it is crucial that all parties involved can trust their cash registers – in this case the thermal energy meter. How do you ensure this trust? On our side, we are following a set of guidelines that describes exactly how to manufacture and verify meters of high accuracy and strong reliability. In this Blog post about EN1434 you will learn how you, your customers and society can benefit from this standard. We will discuss the initial verification tests and the flow accuracy classes, as well as calibrations tests.
Initial verification test
EN1434 ensures 100% repeatability as the standard requires an initial verification test on each produced thermal energy meter or sub-assembly before it can get approved and sold. The initial verification is a series of tests and visual examinations carried out to determine repeatability according to the type approval. It is therefore never a single point measurement, but requires multiple test measurements of every single thermal energy meter or sub-assembly. All tests are specified in EN1434. Using the test results, a calculation is made to ensure that every produced calculator, flow sensor or temperature sensor pair is below the MPE for all possible temperatures or flow differences in the range specified in the type approval. If the thermal energy meter or sub-assembly passes all tests and examinations, it is given legal character by its acceptance as evidenced by stamping and/or issuance of certificate of verification.
MPE stands for Maximum Permissible Error, which means highest inaccuracy value a thermal energy meter or a separate sub-assembly (calculator, flow sensor, temperature sensor pair) is permitted to have during test. The MPE is calculated after different formulas depending on if it is a calculator, flow sensor or temperature pair.
For example: If the calculated MPE for a flow sensor is ±2%, it means the uncertainty of the test equipment plus the inaccuracy of the tested flow sensor together must be lower than ±2% to pass the test.
Check our first part of the series on the European framework for legal metrology here.
Flow sensor accuracy classes
Flow sensor accuracy according to EN1434 is divided into three accuracy classes because the calculation takes into account the uncertainty of the test equipment used to test the accuracy. The tolerance of the equipment used to perform the test must be less than 1/5 MPE to permit the acceptance limit to be equal to MPE.
For example: To make a flow sensor with an accuracy of 2%, it will require the flow bench to have a measurement accuracy of 1/5 equivalent to 0,4%.
It is not possible to make a flow sensor with accuracy class 1, because the same uncertainty rule of 1/5 MPE applies to the test equipment used to calibrate the flow bench. Test equipment with high enough accuracy to calibrate a flow bench, so it can calibrate a class 1 flow sensor, does not exist. Kamstrup flow benches are class 2 and ISO 17025 approved.
For example: To make a flow bench with accuracy 0,5%, it requires the test equipment for the flow bench to have a measurement accuracy of 1/5 equivalent to 0,1%.
Comparing flow sensor accuracy
Flow sensors that are not tested after EN1434 might appear to have a better accuracy, but this is rarely the case when compared under the same conditions. You need to be aware of many things when comparing flow sensors not approved after EN1434 with those approved after EN1434. For example:
Dynamic range
Dynamic range after EN1434 is always from qp to qi.
qp is the highest flow rate also called permanent flow rate. Here the meter must function continuously without the MPE being exceeded.
qi is the lowest flow rate also called minimum flow rate. Here the meter must function without the MPE being exceeded.
Tested with water or with electronic simulation after production
Some manufacturers try to save money by simulating flow with electronic equipment and as with all equipment, there will be an uncertainty which can vary during testing.
EN1434 requires every produced flow sensor to be tested at three different flow rates with water. It is not enough to test the flow sensor using an electronic flow simulation.
Calibration Certificate
It is not all manufacturers that can deliver a calibration certificate, and some can only deliver a calibration certificate where the flow sensor:
- Is tested at only one flow rate
- Is tested with electronic simulation and not water
- Calibration certificate is from a sample control and not the exact flow sensor
- Calibration certificate is from the master flow sensor and not the exact flow sensor
It is a requirement after EN1434 that a calibration certificate is made for every produced and approved flow sensor. It is possible to get this calibration certificate delivered with the flow sensor but Kamstrup also saves these calibration certificates 10 years after the flow sensor is approved.
Uncertainty of test equipment
EN1434 includes the uncertainty regarding test equipment to ensure the customer knows the correct accuracy. Many manufacturers do not include the uncertainty of the test equipment when stating the accuracy. Therefore, you might experience big uncertainty regarding the accuracy when buying a flow sensor that is not EN1434 approved.
Accuracy only stated at one flow rate or within a limited flow range
Some manufacturers choose to only show the highest accuracy without showing how it is measured. Buying a flow sensor with a high accuracy at a specific flow rate and temperature is not a guarantee that the same accuracy will be across the flow range or temperature range.
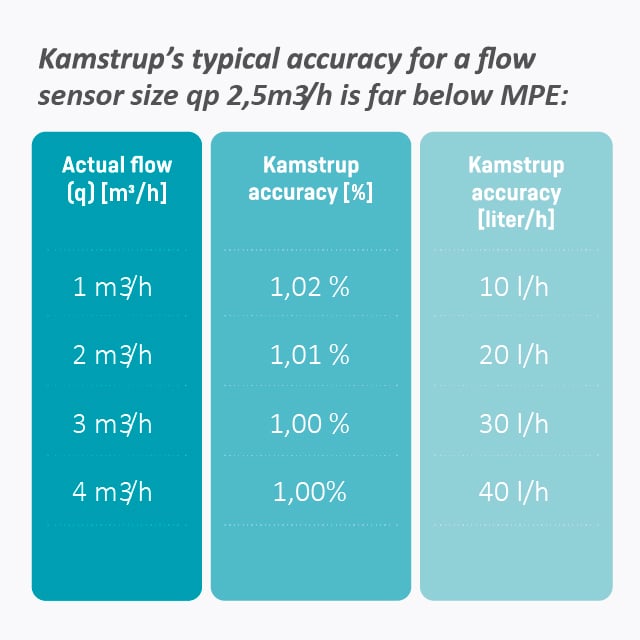
When buying a flow sensor approved after EN1434, you are guaranteed an accuracy below MPE across the whole flow range.
Repeatability
Many manufacturers only do sample testing, which can increase the uncertainty of the accuracy. This uncertainty can vary during a batch, making it impossible for the customer to know if the stated accuracy is complied with.
Flow sensors approved after EN1434 have a repeatability of 100% because EN1434 requires every approved flow sensor to be tested at three different flow rates with water after production and will not be approved if the accuracy is above MPE.
Flow sensor initial verification test
EN1434 requires the flow sensor to be tested at three different flow rates and one temperature during initial verification tests.
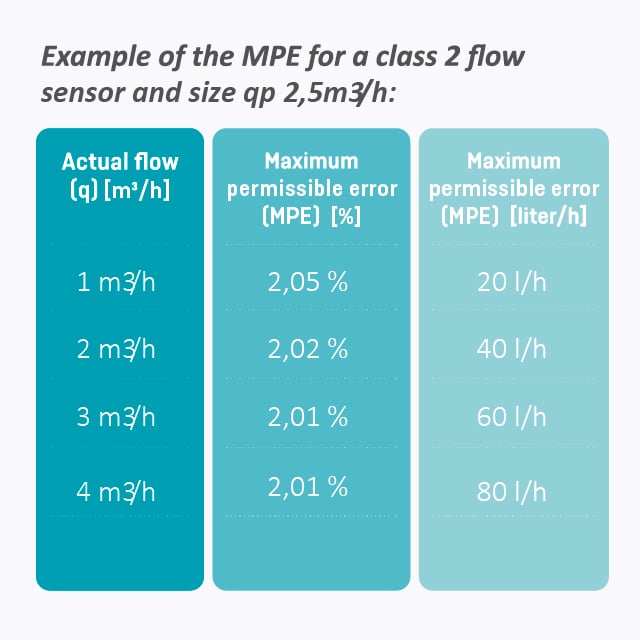
Flow sensor MPE formula:
Class 2: Ef = ± ( 2 + 0,02 ( qp / q )) but not more than ± 5%
Class 3: Ef= ± ( 3 + 0,05 ( qp / q )) but not more than ± 5%
Ef is the uncertainty in flow measurement expressed as a percentage.
qp is the highest flow rate also called permanent flow rate. Here the meter must function continuously without the MPE being exceeded.
q is the actual operating flow rate.
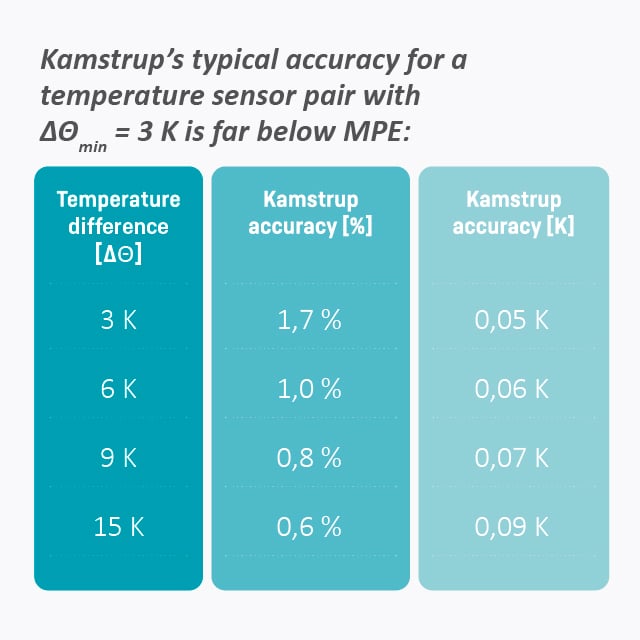
Temperature sensor pair initial verification test
EN1434 requires a temperature sensor pair to be tested at three different temperatures during production.
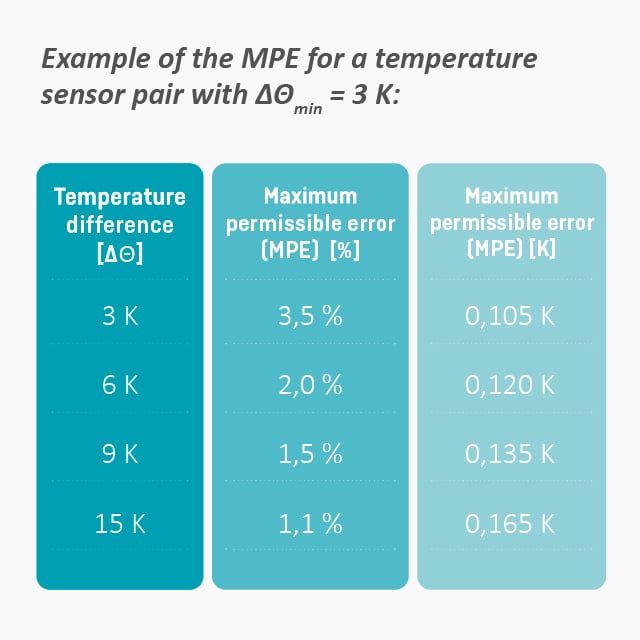
Temperature sensor pair MPE formula:
Et= ± ( 0,5 + 3 ( ∆Θmin / ∆Θ ))
Et is the uncertainty for a temperature sensor pair expressed as a percentage.
ΔΘ is the actual temperature difference during the test.
ΔΘmin is the minimum approved temperature difference.
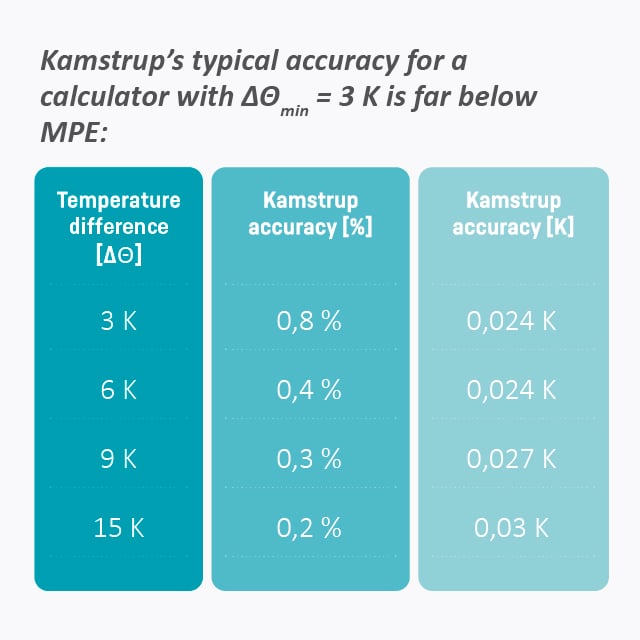
Calculator initial verification test
EN1434 requires the calculator to be tested at two different temperatures for cooling applications and three different temperatures for heating applications during the initial verification test.
Calculator MPE formula:
Ec= ± ( 0,5 + ( ∆Θmin / ∆Θ ))
Ec is the uncertainty for a calculator expressed as a percentage.
ΔΘ is the actual temperature difference during the test.
ΔΘmin is the minimum approved temperature difference.

Calibration Certificate
The calibration certificate shows the precise uncertainty and the MPE. Kamstrup is approved as a calibration laboratory after ISO/IEC 17025:2017.
We offer a calibration certificate in paper form or email for every produced calculator, flow sensor or temperature sensor pair. This report can be delivered together with the thermal energy meter or sub-assembly, but it is also possible to order the report over email up to 10 years after the initial verification test.
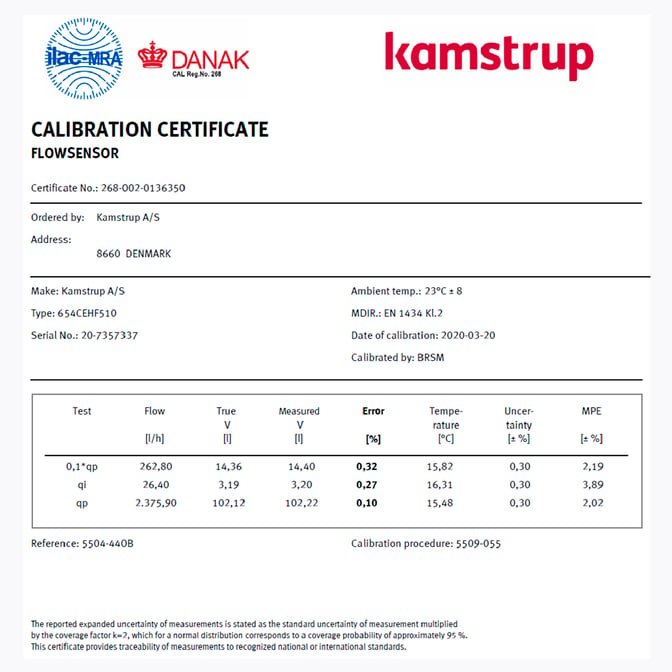
Below is shown a calibration certificate for a flow sensor qp 40 m3/h, Pt500 temperature sensor pair and a calculator.
ULTRAFLOW® 44 calibration certificate explanation
qp is the highest flow rate also called permanent flow rate. Here the meter must function continuously without the MPE being exceeded.
qi is the lowest flow rate also called minimum flow rate. Here the meter must function without the MPE being exceeded.
Error [%] is the uncertainty of the flow sensor expressed as a percentage.
Temperature [ᵒC] is the temperature during the test.
Uncertainty [± %] is the uncertainty of the test equipment expressed as a percentage.
MPE [± %] is the maximum permissible error expressed as a percentage for the flow sensor and the test equipment together.
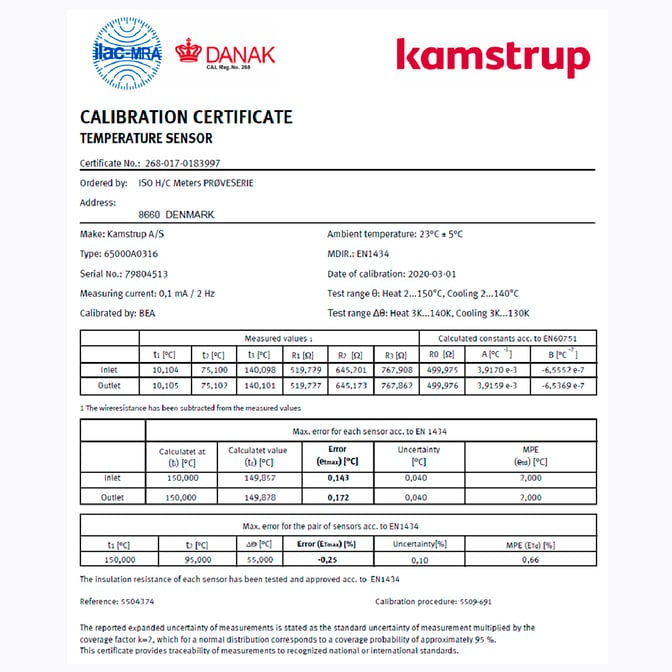
Temperature sensor pair calibration certificate explanation
Error (etmax) [ᵒC] shows the maximum uncertainty expressed in degrees at maximum temperature for each temperature sensor.
Uncertainty [ᵒC] is the uncertainty of the test equipment expressed in degrees.
MPE (etd) [ᵒC] is the maximum permissible error expressed in degrees for the temperature sensor at maximum temperature and together with the test equipment uncertainty.
Test for maximum error for a temperature sensor pair.
t1 [ᵒC] is inlet temperature.
t2 [ᵒC] is outlet temperature.
∆Ө [ᵒC] is the temperature difference between inlet and outlet.
Error (ETmax) [%] shows the maximum uncertainty for the temperature sensor pair expressed as a percentage.
Uncertainty [ᵒC] is the uncertainty of the test equipment expressed as a percentage.
MPETD [ᵒC] is the maximum permissible error expressed as a percentage for the temperature sensor pair together with the test equipment uncertainty.
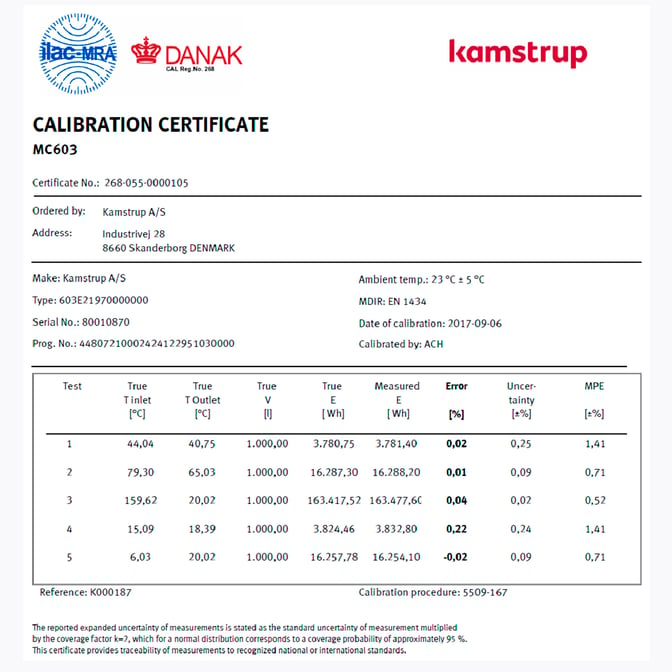
Calculator MULTICAL® 603 calibration certificate explanation
The calculator is tested five times with different temperatures but same flow.
True T inlet [ᵒC] is the precise simulated inlet temperature.
True T outlet [ᵒC] is the precise simulated outlet temperature.
True V [l] is the precise simulated flow.
True E [Wh] is the actual thermal energy.
Measured E [Wh] is the calculated thermal energy from the calculator.
Error [%] is the uncertainty of the calculator expressed as a percentage.
Uncertainty [± %] is the uncertainty of the test equipment expressed as a percentage.
MPE [± %] is the maximum permissible error expressed as a percentage for the calculator and the test equipment together.
Conclusion
Kamstrup ultrasonic thermal energy meters are approved according to EN1434 – a stringent European standard that ensures accuracy and durability upon challenging environmental conditions like humidity, electromagnetic radiation and others, so you can be confident that every meter performs excellent in your installation. Since the development of our ULTRAFLOW®, all flow sensors from Kamstrup use the ultrasonic measuring technique. Our flow sensors are as standard suitable for PN 25. Together, our thermal energy meters are packed with intelligent features that will help you save time and resources during the life time of your meter installation. Our energy meters measure with precision and deliver reliable consumption data even after 15 years in operation.

Author
Product Manager Heat/Cooling Division
December 4, 2020


